


When I first bought a home brewing keg kit it was a quantum leap for my little home brew setup. It was a little tricky though – I tried to do it on the cheap and by myself, so it took a while before I could serve anything on tap!
All keg kits share some basic components. Today I want to share some of the most commonly used variations and also some advice on how to set up and run your keg system, based on a few hard-learned lessons.
Similarities in Homebrew Kegging Systems
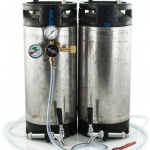
When people talk about “home brew kegs” they are almost always talking about Cornelius Kegs, a 5 gallon (or 18.9 liter) stainless steel pressure vessel. They were originally used for soft drinks in the hospitality industry, and gained huge popularity for home brewers as a lightweight, easy to use alternative to full sized bar kegs.
A basic system requires:

Available at homebrewing.org
- At least one Cornelius keg (two or more is better for brewing and carbonation rotation)
- A CO2 bottle for carbonating and dispensing beer
- A CO2 pressure regulator
- Couplings for the gas line and beer line to the keg – these may be ball-lock or pin-lock types, depending on your keg (ball-lock couplings are more common)
- A tap to serve your beer
- A means of chilling the keg for carbonation, such as a refrigerator
- A means of chilling the beer for dispensing (usually the same refrigerator)
This list is by no means the only way of kegging beer. For example, some people choose to naturally ferment their beer in a keg and dispense using mobile CO2 chargers or bicycle pumps to dispense the beer, eliminating the need for a CO2 bottle. However, this list is the most common, basic equipment to make the whole process work.
Some Common Homebrew Kegging Kits
Below are the frequently used setups most home brewers find themselves using, whether purchased as a pack or because they are just the obvious natural setup. You can find kegs and equipment in your country using my suppliers list, but please read my guide on buying used kegs first.
DIY Fridge Door
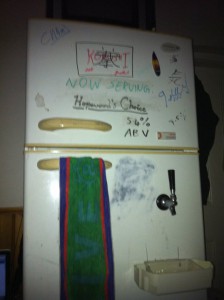 A very simple setup. You drill a hole in your refrigerator door and install a beer tap and a second hole for the gas line. You put your kegs inside the fridge and your gas bottle outside the fridge. Carbonation and serving occur from the same fridge.
All you really need are the old (but working) fridge, a couple of kegs, the gas bottle, and regulator (plus the line and fittings of course). It’s an easy way to start kegging without spending a fortune.
Only drill through the door of your refrigerator, anywhere else and you risk puncturing a coolant line, which will destroy the fridge.
Mobile Keg
You will still need a way to chill your kegs for carbonation, but a mobile setup means you can take your keg away from home and enjoy anywhere. All you need is a tap for serving and a way to pressurize the keg.
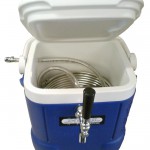
Jockey Box from homebrewing.org
A very low-tech system involves a neoprene ‘keg parka’ to keep the beer cool, a plastic picnic tap to serve from, and a bicycle pump or a mini CO2 charger to pressurize the keg. More advanced setups include wheelie bins full of ice with bar taps and CO2 bottles attached. When lugging around 20 kilograms worth of beer, wheels are just awesome.
Another version is the Jockey Box – you fill it with ice and the keg is kept outside. The beer passes through a metal tube coiled inside the ice and out of the box again, chilling the beer between the keg and the tap.
Kegerator
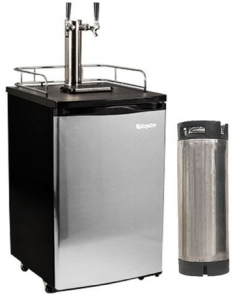
Kegerator with keg
These are a fancier version of the fridge door system. They are a bar fridge with room for one or two kegs only, and instead of installing a tap in the door, you install a beer font into the roof of the bar fridge.
You can make this yourself, but professionally made versions are really excellent, featuring cooled fonts and better workmanship than I am personally capable of. Try taking a look through eBay or some of my suppliers for a range of really cool kegerators.
You can find out more about the best kegerators in my review here: Kegerator Reviews
RELATED: Proven Ways To Chill Your Beer Fast
Beer Chiller
This is the Rolls Royce of homebrew keg systems. In fact, most of the bars I have seen in China 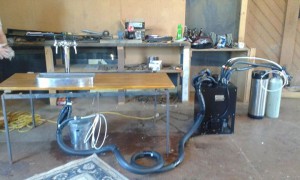 and the small ones in Japan use these! It won’t help you carbonate the beer in the kegs though, so you will still need a keg fridge.
The chiller is simply a mini-refrigeration unit that chills a bath of ice water or glycol, which has steel tubes coiled inside it. The beer runs through the steel tubes to the tap. This is to the jockey box what dynamite is to a firecracker.
To see the one I set up with some friends, take a look here: How to Chill Beer Fast
Draught Beer Engine

This is a not so common way to use Cornelius kegs, but follows an old fashioned method of packaging and serving draft beer. Essentially you buy or build a hand pump which creates a vacuum and sucks the beer from the keg into the glass. The beer, nowadays called “real ale” will appear to be flat, but in fact is carbonated to around 50-75% of most other styles.
In ‘Radical Brewing’, author and amazing beer guy Randy Mosher provides a detailed instructions on how to modify a Cornelius and build an entire beer engine in the old style for yourself – it’s glorious. Grab a copy from Amazon in your country!
Tips For Use
- Never drill through the sides or back of a refrigerator. You are very likely to hit the Freon lines and destroy the fridge. Similarly, avoid the roof if possible.
- Always keep your kegs clean. Wash and sanitize them thoroughly as soon as they are empty.
- Use keg line cleaner and an empty keg to flush your lines clean, followed by fresh water and then by the next beer.
- Using a gas line splitter is an excellent way to have two beers served at once or carbonating at once, but you will need an extra regulator if you want to serve one beer and carbonate another.
- To serve and carbonate at the same time, I like to use a mini CO2 charger on the keg that I’m serving from and my gas bottle for carbonating.
- Kegs can leak, usually from the seals. Use soapy waters and CO2 pressure to test fittings and seals for leaks, and replace them if needed. Most home brew shops have spare keg seal kits.
CHEERS!
Thank you for reading, I hope you found this information valuable. If you need some further reading, please check out these links:
- Buying New vs Used Kegs
- How to fill bottles from a keg
- Building a bar using a Beer Chiller
- Where to buy home brewing keg kits
- Guide to buying brewing gear on eBay
- Home Made Vs. All-In-One Brewing Systems
If you have any questions or you want to share your keg system with us, please scroll down and leave a response!
Read Next: Common Mistakes When Keeping Beer Cold
Hello,
Very informative article for all the beer lovers out there. The kegerator is such a great and smart invention that I wish I was smart enough to make for myself.
My friend has one and from reading your tips there are things that I will need to tell him. Vary valuable information because I know that they can break down if not properly taken care of. Best of luck.
Hi Rob,
Making a Kegerator doesn’t require too many smarts, but buying one yourself is definitely easier. Try eBay to see if there are any cheap home made ones available.
What types of liquer could one brew in a thing like that!?
Hi Danni,
The first thing to mention is that making your own spirits and liquers is not legal everywhere – you will need to check the legal side in your home state / country.
As to your question, these keg kits are not used to produce liquers, they are for serving drinks that have already been made. If you are just beginning, a better place to start would be here: . This page will show you what is needed for basic fermentation, which leads into distillation and production of liquors and liquers.
Please feel free to ask further details once you’ve checked out the page above.
Kind regards,
Jesse Hopwood