


So you’ve bought yourself a keg system. You can carbonate your beer in almost no time at all and you are proudly serving your winning beers from your own bar taps. Great stuff!
But…now you’ve realized that you can no longer take over a couple of bottles of your home brew to a barbecue…you can’t even send a bottle off to your next competition! It’s time you learned to start filling bottles from a keg.
If you’re reading this, you’ve probably already tried filling directly from the tap. Let me guess: it didn’t go so well, did it? I know, because I too had this problem several years ago. I was amazed I had anything in the bottle at all. Let me tell you why this happened…
You Need a Bottom-Filling Beer Dispenser
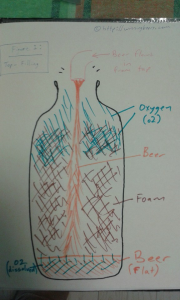
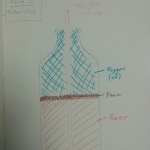
Bottom filling beer is important for two main reasons. First, the obvious: if you fill from the top of a bottle you get a load of foam spewing from the bottle neck. This is called ‘fobbing’. Second, you can severely reduce the amount of oxygen in your bottle. This is very important – your beer will go stale in almost no time if you fill from the top of the bottle.
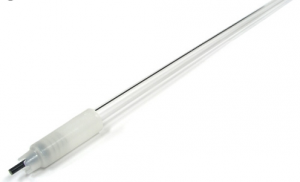
A bottom filler, in its basic form, is an extremely simple device. It is simply a tube that connects your beer source to the bottom of your bottle, allowing beer to flow directly to the bottom. In fact, your bottling wand for bottle-conditioning from the fermenter is a low-tech bottom filler!
When building your own or choosing a bought one, the main factors you need to consider are:
- Will it reach the bottom of the bottle?
- Will it minimize foam (fobbing)?
- Can it stop oxygen from getting into your beer?
- How big is the risk of it infecting your beer?
- How easy is it to clean?
And two more factors for bonus points:
- Can you control the flow from your keg to the bottle (without fobbing)?
- Can you purge all the oxygen, leaving only CO2?
RELATED: Home Made Vs. All-In-One Brewing Systems
Best Practices When Filling Bottles from a Keg:
Before we get to the actual fillers, I’d like to share a few tips that will make filling beer from kegs a whole lot easier.
Keep the Beer Cold
CO2 stays bonded to liquid beer up until 2ºC (that’s 35.6°F). The warmer your beer gets, the more easily it will foam up. Ever failed to pour a decent beer on a hot day? The principle is the same. As soon as your beer heats up, it will try to expand. It can’t do this inside a pressurized keg, so it will try to expand as soon as it leaves the keg – right into your bottle.
Keep your keg refrigerated. For even better results, use cold bottles and for best results when consuming, a Beer Koozie which can be made out of a variety of materials to keep your beverage cold.
Regulate Your Keg Pressure
You want your keg at serving pressure, not carbonation pressure. But you still want to fill your bottles quickly. The correct pressure is a matter of preference, but please be aware of a couple of things:
- Too much pressure: your beer will almost certainly foam, and then it will fly out of the bottle like a tsunami of beer.
- Too little pressure: not only will your bottles will take forever to fill, but chances are you are filling from the expanding CO2 from your beer – which will actually cause you to lose bubbles – you’ll be bottling flatter beer!
Have an Extra Keg
The extra parts required for bottom filling are all opportunities for your beer to get infected. Keep an extra keg full of sanitizer. Before you start filling, run the sanitizer through all of the equipment and lines you will use. You can also use this same batch of sanitizer for your bottles.

Types of Dispensers
Finally! I’m going to cover three main types here: A simple, DIY bottle filler, a beer gun and a counter pressure bottle filler. The last is my personal favorite, but there are a few types so I’ll include some basics for you as well.
The DIY Bottle Filler
This can be a great option if you are on a budget. All you really need is a tube that fits to your beer tap and is the same length as your bottle. You just sanitize the tube, attach it to your tap, set your keg pressure, and start filling bottles. Easy!
You can also use a picnic tap and your old bottling wand – they fit each other perfectly for this purpose.
Pros:
- Very cheap
- Easy to use
- Minimal cleaning required
Cons:
- Still likely to have issues with foam
- Cannot purge O2 from the bottle
- Hard to regulate flow with accuracy
- High exposure to outside environment (risk of infection)
I love it for: Being really cheap and a great way to fill one or two bottles when I’m on the run.
I hate it for: Not being able to protect my beer from oxygen.
VERDICT:
This cheap-and-cheerful bottom filler is perfect for bottling just a few beers at a time so you can share them when you go out. However, you beer is likely to go stale much sooner, so it isn’t really suitable for sending to a competition or as a gift. You’ll soon want to upgrade.
The Beer Pistol
You may already be using one of these as your beer server. They are sometimes called a Pluto gun, or other variations. Essentially a beer pistol is just a tap that uses a pistol grip and trigger to release the beer. They usually have adjustable flow control, which is a bonus.
This is easy to do: you regulate your dispensing keg pressure, set the flow control, stick the barrel of the beer gun into the bottle, and squeeze the trigger. Bonus points if you tilted the bottle!
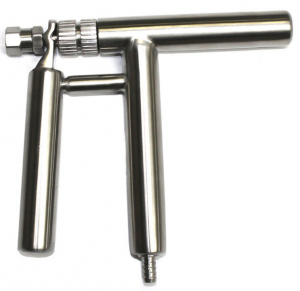
Pros:
- Flow control
- Very easy to use
- Reduced chance of fobbing
- Reduced chance of beer absorbing O2
- Cheaper than a counter-pressure filler
Cons:
- Higher cost than a DIY model
- Does not purge CO2 from bottle
- Does not reach the bottom of most bottles (you have to tilt the bottle)
- Requires careful cleaning
I love it for: The ease of use! Once you have the pressure and flow worked out, you just squeeze and fill. You can do a lot of bottles in just half an hour.
I hate it for: Not reaching the bottom of the bottle. Having to tilt the bottle means that you have to pay very close attention to avoid spillage.
VERDICT:
This is a real step up at a reasonable cost. There are still some drawbacks and your beer will have a short shelf-life, but you can easily transfer an entire Cornelius keg into bottles. A great option for the budget-conscious.
RELATED: How to Filter Beer
Counter Pressure Bottle Fillers
This is how it’s done in commercial bottling lines. There are actually a whole variety of counter-pressure fillers available to the home brewer, so before we start I want to share a brief description of how counter pressure filling works.
How and Why:
The aim of bottling is to have your beer sealed safely, just the same as it was in the keg. This means there should be no exposure to oxygen, no loss of carbonation, and zero chance of infection. You also want the process to avoid fobbing – even without having oxygen present, foaming up will cause you headaches.
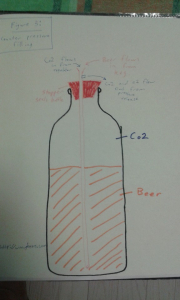
A counter-pressure filler works by pumping CO2 into the bottle before the beer. CO2 is heavier than air, so it sits at the bottom and forces out the air in the bottle. Then, with the filler sealed to the bottle, beer is added instead of CO2.
At this point, because the bottle is pressurized to the same pressure as the keg, no beer will come out until pressure is very slowly released. This means that the beer will fill slowly, at the same rate that pressure is released from the bottle.
This has two distinct benefits:
- Very little foam, if any; the foam can not expand due to pressure.
- No O2 in your beer – extended shelf life!
Types of Filler:
There are so many versions that I’m just going to cover four of the most commonly available counter pressure fillers. If you see any other types and you need help deciding, just remember the main points at the beginning of this article (or leave me a comment and I’ll help you review it).
One I made myself:
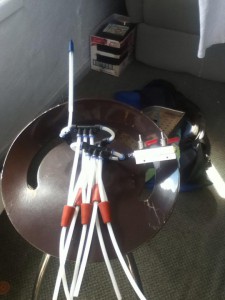
This was designed to fill six bottles of equal size all at once. Flow control is present but low-tech, the purging and filling controls are all integrated. In theory it works.
Unfortunately, in practice, it never worked. I guess I need an engineer to help me build the thing based on my theory.
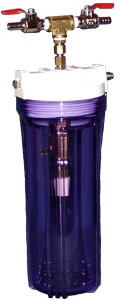
Complex plastic one from eBay:
Don’t even consider all these fancy gadgets with buttons, levers, and pipes everywhere. You never end up with something that works how you want it to. Here are some of the most common complaints:
 Too complicated/poor instructions
- Leaks or exposes beer to the air
- Doesn’t fit my standardized keg system/it only fits one type of bottle
- Requires even more parts
- I need three hands to operate it
Counter-pressure fillers can get expensive. Considering the simplicity of a good one, you can skip these things altogether.
This is actually a kind of ‘half-way’ between the counter pressure fillers below and a beer pistol. It does allow you to remove O2 but won’t actually pressurize your bottle, so you might get some foam and loss of carbonation in your beer.
Easier to use and clean than the best fillers, and with good shelf-life, but not quite as good at keeping the beer carbonated and avoiding foam.
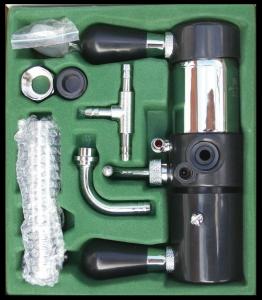
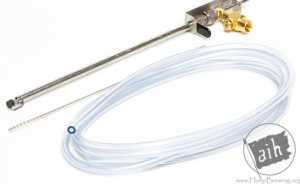
Stick Model:
These are really the best for the home brewer. There are a few variations, such as the MoreBeer or Fermentap counter-pressure fillers. Being the best, it’s this group of fillers I will review today.
Counter-Pressure Filler review:
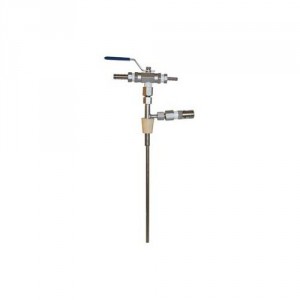
Setting up and using these takes a little practice, but before long you will be an expert (and able to discuss some advanced bottling concepts with your local craft brewer).
You seal the bung inside the neck of your (sanitized) bottle, set the pressure of your keg and your CO2 regulator, and let the CO2 flow. Use the pressure release dial to allow O2 to slowly purge out. Once purged, you close the pressure release and switch from CO2 to beer and gradually open the pressure release until you have the best flow speed.
I’ve always found that about 20 seconds per 330ml bottle was ideal.
- Consistently good results
Cons:
- Can be tricky to get the hang of
- Slightly complicated beer/gas plumbing
- Small parts can be annoying to clean
I love it for: Being super-efficient and giving me consistently good results.
I hate it for: The times I forgot to close off the beer line before removing the filler from the bottle. Beer showers.
VERDICT:
I love these. You can fill a case in a short space of time and have complete confidence that the beer is just as good as it is in the keg.
Get one.
Cheers!
If you find any methods or types of bottom filling beer dispensers that I haven’t covered here, or you have any questions, please let me know in the comments section!
Read next: 7 Easy Ways To Add Personalization To Your Beer Koozies, Speidel Braumeister Brewing System Review and The Science Behind Beer Koozies: How They Keep Your Beverage Cold!
Damn! This article was freakin interesting! Your website
makes my day. Great content and such fun stuff!!
You have explained the principles in a very clear and simple way. I also liked your scientific approach as an engineer. You may seperately develop a new category in your website dedicated to science behind beer. That would be cool!
Thank you very much! I may just do that, are there any particular topics that you would like to know about first?
Hi Jesse
I learned a lot of stuff regarding the beer filling process and the dispensers that are available.
It is interesting to note that a lot has to be considered from fobbing, to infection, to Co2 control when transferring from keg to bottle.
After how long having filled the beer using the recommended dispenser will the quality of beer be maintained before it does go flat or off?
Thanks for an awesome review and read.
Regards
Roopesh
Excellent question Roopesh!
If you have followed perfect sanitation and handling practices, your beer won’t go off or lose carbonation, but it will eventually go stale.
The amount of time varies: Darker and stronger beers will last longer than light or pale beers. The amount of oxygen is also a factor – lower dissolved oxygen in the beer = longer shelf life.
A good average is “about 6 months,” but each recipe you brew will have a different shelf life after bottling so please adjust your Best Before date accordingly.
now THIS looks like an interesting read. I think that people who home brew often make better beer than the traditional ones at the store. its something that just tastes fresher. Anyways, I love keggers because you can use them with a lot of people and prevent a lot of extra work!!
Thanks for this
Matt TheDopestmatrix
Totally agree, you can really taste the difference in a hand made beer! When using the counter-pressure filler, the integrity of the flavour, carbonation and overall freshness of the beer is maintained.
Cheers!
Awesome article! I saw a FB post about these dispensers and was quite intrigued. You present some great content – your comparisons of the bottom dispenser vs traditional methods I found very interesting. Also, your site looks fantastic!
I have a friend who is a Master Brewer for a microbrewery and this sort of article is right up his ally. I’ll make sure to forward your site to him!
– Shep
Thank you very much Shep! I was trained by some German Braumeisters (brew masters) who would give me an earful if I tried to call myself a brewmaster, but I understand it’s another story in some places 🙂
I’m sure your friend will agree with me regarding bottom-filling too!
Cheers
This is a topic that’s near to my heart… Cheers! Exactly where are your contact details though?
Hi Elease, you can find my contact details on the “about me” page. Did you have a question related to brewing?
Cheers,
Jesse Hopwood