


Keg carbonation is one of the quickest and most efficient ways to carbonate beer. It involves using pressurized CO2 tanks to push gas into the keg, allowing it to absorb the CO2 and become perfectly carbonated beer rapidly.
This process is much faster than bottle carbonation, making it perfect for brewers who want their beer ready to drink sooner. It also eliminates the need for bottle conditioning and can help save on wasted bottles.
Are you a craft brewer looking for an efficient, cost-effective way to carbonate your beers? The carbonation process for mini kegs is quick and simple, and with these packages, you can get everything you need in one place. So if you’re looking to learn about keg pressure, correct regulator setting or force carbonation this article is a good starting point.
Look no further than Growlerwerks bundles! Start outfitting your brewery today to enjoy perfectly carbonated beers!
What is a Mini Keg?
A mini keg is a pressurized vessel used to store, dispense, and transport homebrew beer or other beverages. The vessels are usually made of stainless steel or aluminum, although plastic versions also exist.
They generally come in sizes of 1 liter (33 ounces) or 2 liters (66 ounces). In addition to storing beer, mini kegs allow users to carbonate their beer quickly and easily.
Types of Mini-Kegs
- Mini Cornelius (corny) kegs are a half-sized version of the home brewers’ favorite. They feature the same quick disconnects for beer-out / gas-in and are easy to carbonate but less helpful in serving than some. Corny kegs are commonly used for homebrewers who want to dispense beer from their kegerator.
- Pressurized growlers come in many forms and are typically great for serving in but not so much for carbonating in
- Growlerwerks Mini Kegs are specifically designed to allow easy-force carbonating of your beer.
What is Beer Carbonation?
Beer carbonation is a process that gives beer its signature bubbles and its unique flavor. This process involves fermenting yeast with sugars to produce carbon dioxide, which is then trapped in the beer.
The beer carbonation process can create a range of beers, from light lagers to heavy ales. The amount of gas added to the beer will vary depending on the type of beer being brewed and the desired flavor profile.
Carbonation levels are typically measured in volumes of CO2 per liter (Vol/L), with most beers having between 2.5-4 Vol/L. High-carbonation beers, such as Belgian wheat or English bitters, can reach up to 5 Vol/L or higher.
Carbonating beer requires precise control over temperature, pressure, and time for optimal results. Typically, brewers will use a pre-measured dose of sugar and yeast in sugar water, called priming sugar, which is added before bottling or kegging the beer.
This mixture creates carbon dioxide when it ferments in the bottle or keg. As it ferments, the rising pressure levels push out any air from the container while trapping some of the CO2 inside. When this process has completed, the container is opened, and a small burst of C02 rushes out due to a sudden atmospheric pressure shift; this causes some beers to fizz when opened!
Carbonating beer also plays an important role in aroma delivery as well as taste; aroma molecules are best released by those tiny bubbles which make their way up through your glass until they finally reach your nose!
Ales tend to have a more complex aroma profile than lagers due to their higher fermentation temperatures and shorter conditioning times, allowing more hop oils into the solution than lagers.
In addition, pale ales benefit from higher volumes of CO2 since this helps to soften some of their harsher flavors caused by hops or roasted grains.
Overall, beer carbonation can contribute significantly to a good-tasting brew; it adds life, character, complexity, and body – all vital components for crafting great-tasting beers!
2 Methods for Beer Force Carbonation
There are only two methods for forcing carbonation while carbonating.
- The first technique is what we’ll call “slow” forced carbonation.
- We’ll refer to the second method as “rapid” forced carbonation. You must ensure that the beer you are force-carbonating is cold before using either of these procedures.
Cold beer absorbs and retains CO2 significantly better than beer that is warm or at room temperature.
CHECK OUT: All in One: Electric Beer Brewing Systems
How to Force Carbonate a Keg
It’s advisable to start carbonation after the beer has chilled. There are several ways to force carbonate your beer in the keg, each with its advantages and disadvantages.
Force carbonation is accomplished with pressurized CO2 from a gas cylinder. When the beer in the keg is chilled, the process will go the quickest. This will enable the CO2 to diffuse faster and more effectively into the brew.
For home brewers, the “set it and forget it approach” is the most precise and straightforward way to force carbonate beer. Choose the temperature of your refrigerator and the desired carbonation rate, set your CO2 regulator to that pressure, and wait 5 to 10 days for the beer to carbonate.
Some other variables affect how much CO2 will saturate the solution, such as the remaining sugar levels in the finished beer and the alcohol content.
RELATED: How to Filter Beer
Beer Carbonation in Mini Kegs
Beer keg carbonation is a fast and convenient way to carbonate your beer. All you need is a regulator, CO2 tank, and mini keg.
- The old-school carbonation method is to add sugar to the brew in a pressure-sealed container (such as a bottle). The yeast produces co2 as it eats the sugars, but the pressure isn’t released, so the co2 is absorbed into the beer.
- To force-carbonate in any vessel, we will pressurize the container (a keg, for example) with co2 to force the co2 into the liquid.
- Co2 bonds to liquid at about 2 degrees Celcius under normal atmospheric conditions. Therefore, the cooler you can keep your container of beer, the easier it will be to carbonate.
- If your mini keg has a gas regulator, set it to around 90 kPA pressure or about 13 psi. Connect your co2 source (probably a co2 bulb) and let it sit in the refrigerator for about 48 hours.
- Reduce the pressure to the manufacturer’s recommended serving pressure, dispense a beer sample, and taste test.
- Be careful – you might need to use a couple of co2 bulbs, depending on the brew size!
- If your mini-keg doesn’t come with a gas regulator, you probably have only a trigger connected to your co2-inlet. You’ll need to chill the beer first, then add a quick burst of co2. Rock the mini-keg back and forth (don’t shake) for about 20 seconds to agitate the liquid – this helps it absorb co2 when chilled and under pressure.
- Repeat this process several times. Dispense a sample of beer and taste test. Repeat until desired carbonation is achieved.
Mini kegs are a convenient and attractive way to package and serve beer. Beer carbonation is a critical part of the packaging process, as it affects the taste, aroma, and appearance of the beer. Here is a look at beer carbonation in mini kegs:
Carbon Dioxide Levels: Most commercial breweries will use between 2.4 and 2.7 volumes of CO2 when filling large kegs. For mini kegs, this can vary widely based on style and brewery preference, so it’s important to check with your manufacturer for specific levels for your keg.
Conversion to Imperial Units: To convert volumes of CO2 in mini kegs to imperial units (bar), simply multiply by 0.13 (2.6 volumes x 0.13 = 0.338 bar).
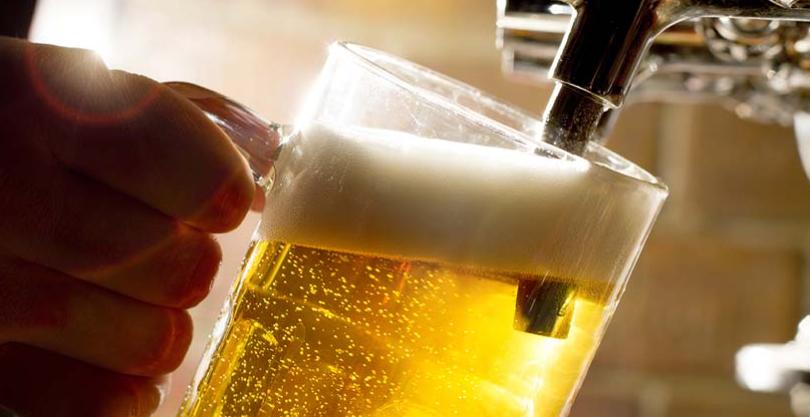
Pouring Instructions: When pouring from a mini keg, pour slowly down the side of the glass and allow some time for foam creation as you fill-up the glass completely before stopping the tap. This will help maintain an ideal level of carbonation while ensuring that no foam comes out with the beer!
Serving Your Beverage
Once your beverage has been properly carbonated and chilled down, you can start serving!
Before serving, release the excess pressure in the keg using the release valve and set your regulator to serving pressure, around 12 psi. Open up the faucet attached to the lid and let gravity do its work—the pressurized liquid should easily flow out into glasses or mugs below.
If necessary, adjust regulators as needed for optimal flow rate during service. Additionally, always follow food safety guidelines when handling any food or drink product!
Conclusion
Beer keg carbonation is an important and necessary process for producing great-tasting, high-quality beer. With the right tools and knowledge, achieving the desired carbonation level for your brews can be easy.
By understanding how beer carbonation works, the different types of carbonation levels available, and following proper steps when priming and serving your beer, you can ensure each beer batch is served at its prime. Cheers!
Are you looking to take your home brewing setup to the next level? Look no further than these Growlers Bundle! With high-quality materials and equipment, you’ll be enjoying your very own homemade brews in no time. Start brewing today and see where it takes you!
Read Next: Risks Associated with Improperly Homemade Fermented Drinks, The Art of Secondary Fermentation In Making Hard Cider and How To Find The Best Materials For Beer Koozies