


AUTHOR’S NOTE:
This guide contains technical brewing jargon which may be unfamiliar to some home brewers and also to people who speak English as a second language. If you need assistance with a particular term, please leave a comment below the article and I will be glad to help.
If you want to try out your roasted grains, I have a book of recipes available free of charge: please click here.
 About Specialty Malt
Traditionally, beer is made with one main type of malted grain – the base malt. There are many different base malts, and historically these have been based on location, with names such as Pilsner malt, Vienna malt, Pale malt, Ale malt, and so on.
This works for creating a drinkable, alcoholic malt beverage, but it does leave something missing. Over centuries, maltsters began developing techniques – techniques which you can use yourself to roast grains at home –to alter the flavor, aroma, and chemical profile of malt and change the resulting beer.
Brewers ever since have been using this development of ‘specialty malt’ to add color, flavor, and aroma, creating winning beers that have pushed the boundaries of the drink as we know it. Specialty grains themselves have diverged into several mainstream groups: Toasted malts and Crystal/Caramel malts, each of which are divided into numerous commercially available specialty malts.
Why Roast Your Own Malt?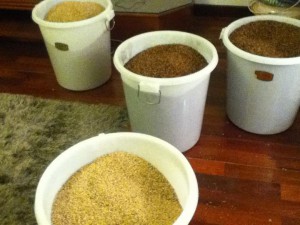
If you are able to walk into a local homebrew store and order any malt type named in any recipe, consider yourself a lucky customer. Generally, however, you can find whatever you need either in-store or online. However, several experiences brewing in Asia have taught me that this is not always the case!
I had to learn to make my own specialty malt. In the process, I discovered something else: it’s seriously satisfying! There is something that feels so right when you smell your malt roasting in the oven and then again when you get a whiff of it in your own beer.
There are also some technical reasons why you as a brewer may decide to roast your own specialty malt. For a list of free recipes that you can use, click here.
- Achieve a very specific flavor profile in your beer
- Get the aroma just right
- Hit the perfect beer color
- Alter the PH of your mash (and alter the overall beer chemistry)
Difference Between Specialty Malts
Remember the two main groups of malts – Toasted and Caramel or Crystal malts? Well, the easiest to identify are the Toasted malts. These have been malted and dried and are ready to be used in beer. However, after being dried, these malts are then toasted until they reach the desired profile. Toasted malts are the best for changing the PH of your mash, which ultimately alters the performance of your yeast.
 The Crystal and Caramel malts are roasted or kilned wet, whether before being dried or after drying and being rehydrated. The wet roasting process means that these malts are partially converted – some of the starch in the grains become fermentable sugars, and some of those sugars go even further and become crystallized into caramel. This leaves the malt colored darker and sweeter, both easier to mash but simultaneously with less potential fermentable sugar.
There is another type of malt that sits somewhere between the two – Munich malt. Munich malt is kilned with a totally unique industrial process that makes it perfect as both a base malt or a specialty malt.
By far the most gratifying way to make specialty malt at home is by roasting, and that will be the focus of the following How-To guide. To make toasted malt, simply follow the process without soaking your malt.
How To Do It
Before you begin, you will need:
- An oven with a reasonably reliable thermostat or other temperature control (bonus points for a fan-forced oven!)
- 2x oven tray with high sides capable of holding liquid (or in this case, a lot of grain)
- A large bowl
- A large colander or strainer to fit in said bowl
- Enough uncrushed base malt to form about a 1 inch grain bed in each oven tray
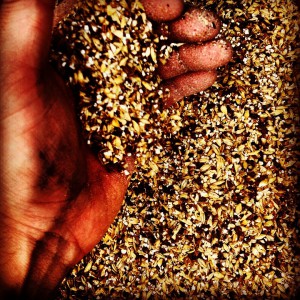
First, soak your grain for 24 hours in demineralized water in a large bowl (if you can’t get demineralized water, any filtered or non-chlorinated water will do). Drain your malt through a colander – the malt should be quite soft.
Lay your grain evenly in one baking tray, just about two inches deep. Next, you are going to aim for a chemical reaction within the grain itself – don’t worry, it’s very easy: you want to heat the malt so that you get some enzymatic activity, converting the protein chains into soluble (fermentable) sugars. Place it in your oven at about 70°C (that’s about 160°F) for two or three hours.
Now, take half of the grain and lay it in the second tray. Set the oven temperature to around 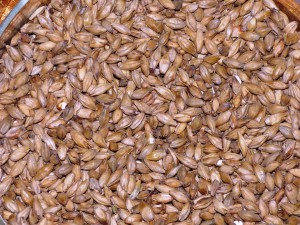 100°C, give or take 5° (that’s about 210°F, give or take 10 degrees.) The trick now is to not stir constantly, but to make sure you turn the grain in both trays about once every half an hour. You are aiming for a combination of even grain exposure to the heat and even grain color, but without letting heat escape from your oven.
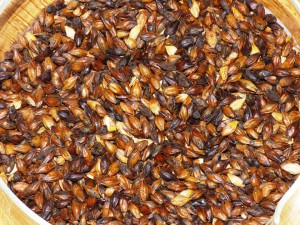
Keep tasting a grain or two each time you turn; it will have a stronger taste than its color suggests. Eventually the grain will be dry and crispy when you bite it; at this point it is ready as a Pale Crystal malt. You can stop now, or you can continue to roast until it is a Dark Crystal or even Chocolate malt. If you do decide to keep roasting, you might want to raise the temperature to 150°C (300°F) to speed up the process – just remember that roasting wet produces different flavors to roasting dry.
Once you are done roasting, let it cool but keep turning it every half hour until it hits ambient temperature. You could technically brew with your home made specialty malt right away, but you will find harsher, ‘roastier’ tastes if you do so. It’s much better to let the grain mellow in a dry environment, such as a dry, sealed container for a week or two. This removes some of the harsher flavors to dissipate, ‘along with the wind’.
How to Tweak Results
- Start with a different base malt. Each type, each maltster, each farmer, will have a slightly different taste and will yield a different result. Experiment and have fun!
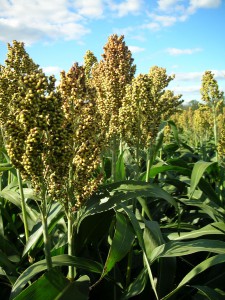
- Don’t get caught up on barley – you can roast all kinds of grains: wheat, millet, sorghum, even corn or coffee can be roasted and included in your beer!
- Smaller, thinner grains will dry and darken faster. To get a truly uniform roast, start with a truly uniform grain size. Good luck!
- Every combination of oven heat, moisture content, and time spent in the oven will produce a different result, as will your particular environment. Try out different combinations.
- For a more caramelized flavor, raise the temperature before the grain is completely dry.
- For a more roasted flavor, hotter and drier roasting conditions are better.
- The malt will taste darker than it looks and the contribution to finished beer color will be much more than you expected.
 Cheers!
I hope you have as much fun roasting your own malt as I do! If you have any questions or feedback, please do leave a comment.
These roasted grains are great to use in a recipe. I have about 640 winning beers that you can use for free, just follow this URL: https://winningbeers.com/beermail
Read next: 7 Easy Ways To Add Personalization To Your Beer Koozies
Hi Jesse,
Wow, I didn’t think I could enjoy this article as much as I did, it’s super interesting. I love beer, and different kinds of beer and beer matching, and whilst I know the basic process of making beer, I had no idea on grain roasting and all the variables that come into it.
Now I’m starting to understand a little bit about all the pieces that come together to make craft beers. I’ll definitely keep your site in mind!
Thanks again for sharing all your knowledge, and all the best,
Katia
Thanks Katia!
It’s a great way to take over more of the process, and somehow just feels “right.” And the smell of roasting malt is just amazing!
hey, thanks for informative article. I learned some new stuff about different kinds of malts to help me in brewing my own beer. Now I just have come up with the plan and develop my own roasting schedule, and maybe one day turn it into a regular brew day feature. Helpful page. Will definitely bookmark it, and come back.
Thanks,
Cheers
Thanks Ruslan, glad you liked it!