


If you want to take your homebrew to the next level, consider kegging it. Kegs are a convenient and efficient way to store and dispense your homebrew.
Not only will you be able to enjoy your brew quicker, but you’ll also have access to a professional quality beverage.
What Is Kegging?
Kegging transfers your homebrew from a fermentation vessel into a pressurized container known as a “keg.”
This allows the carbon dioxide (CO2) created during fermentation to stay dissolved in the beer and give it its characteristic carbonation level.
The CO2 pressure also helps keep oxygen away from the beer, which prevents oxidation and helps preserve its flavor over time.
While many home brewers will bottle their first few batches of beer, we believe that the best way to enjoy your craft beer is with a draft beer system!
Home brewers have a few different kegging systems they can choose from. The most common are Cornelius or “Corny” kegs, Sanke kegs, and 5-gallon kegs. This can be a good holiday gift for your beer-loving friends.
Corny Kegs
They are made from stainless steel and come in a variety of sizes. They are convenient for storing your beer and easy to transport, making them ideal for home brewers.
Sanke Kegs
Larger and designed to be connected directly to beer taps or faucets. They are commonly used in bars and restaurants but can also be used by home brewers. They are usually made from aluminum or stainless steel and come in various sizes.
5-gallon Kegs
Perfect for home brewers who want to dispense their beer with a traditional tap system. These kegs are also made from stainless steel and are very durable.
Once you’ve chosen the proper keg for your homebrew, you’ll need to ensure you have all the necessary equipment.
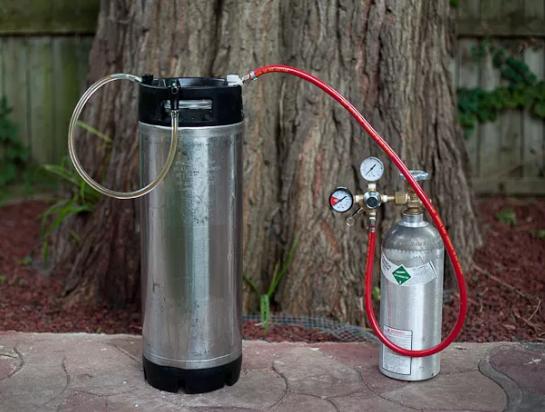
This includes a nitrogen regulator, CO2 tank, kegging hose and fittings, a keg tap and faucet, and tubing for connecting the tap to the keg.
Related: How To Carbonate In Mini Kegs
Kegging Equipment For Homebrewing
Apart from drinking, of course, there is no greater satisfaction in home brewing than kegging because it gets rid of the tiresome task of bottling. As a result, carbonation takes less time.
Whether you still enjoy the intimacy of bottling or are ready to step up your game with keg systems.
Beer brewing keg kits come in various sizes, ranging from a 5-gallon capacity to a 15.5-gallon size. The most popular and widely used kegging system is the 5-gallon Cornelius ball-lock keg.
This size will serve your needs in most cases and will fit into your refrigerator. If you’re planning to do beer at a party or gathering, you may want to invest in a giant keg.
Keg Your Homebrew For A Professional Quality Beverage
Gather Your Supplies
The first step is to gather all the necessary supplies when you start kegging. You’ll need a sanitary bucket to mix your sanitizing solution, a sanitizing solution, and tubing and clamps for siphoning purposes. Of course, remember the keg itself.
Sanitize Everything
Once all your supplies have been gathered, it’s time to start sanitizing everything that will come into contact with the beer. This includes the bucket for mixing the sanitizer, any hoses or tubing used for transferring the beer from one vessel to another, and finally (of course) the keg itself. Ensure that your disinfecting solution covers every surface before moving on to the next step.
Fill & Carbonate Your Keg
Now it’s time for the fun part – filling up your keg! Once you’ve filled up your keg with beer, attach an air line hose between the tap of your keg and a CO2 tank or cylinder to carbonate it correctly.
Homebrew Kegs: A Step-by-Step Guide
Kegs are a great way to store and serve your homebrew beer. They are easy to transport, provide a longer shelf life, and can be used to carbonate your beer. This guide will show you how to keg your homebrew in 7 simple steps.
Step 1: Cleaning Your Keg
The first step is making sure that your keg is clean. Start by removing the keg’s lid and checking for any dirt or debris inside the keg. If there is anything in there, fill the keg with warm water and a few drops of liquid soap and swish it around to loosen up any dirt or debris before draining it out. Once you have done this, rinse the keg with cold water several times until it’s free of soap residue.
Step 2: Sanitizing Your Keg
Once your keg is clean, you must ensure it’s sanitized before filling it with beer. Fill the keg with 1 teaspoon of unscented bleach per gallon of water and let it sit for 15 minutes before draining it out. Do not rinse out this solution, as the chlorine will help keep bacteria away from your homebrew beer.
Step 3: Connect the Gas Line
Now it’s time to attach the gas line to your keg. Make sure you use a quality gas line that won’t burst when pressurized with CO2, then attach one end of the line to the regulator on your CO2 tank and the other end to the top of the keg lid. Make sure both ends are tight, so there are no leaks when pressurizing your homebrew beer later on down the road!
Step 4: Connect The Liquid Line
Next is connecting the liquid line from your faucet or tap handle to your keg so you can quickly pour yourself a glass of homebrew beer whenever you want! Attach one end of this line securely onto either side of your faucet/tap handle and then attach the other end to either side of your CO2 regulator on top of your tank (you may need an adapter). Ensure all connections are secure so there are no leaks when pouring out some delicious homemade brew!
Step 5: Fill Your Keg With Beer!
Now that everything is connected correctly, all that’s left is to fill up the keg with delicious homebrew beer! Take off both lids from either side of your fermenter bucket (or carboy) and carefully pour all 8 gallons (32 liters) into each side until full. Make sure to fill the right amount, as this could lead to overflow when pressurizing later on down!
Step 6: Pressurize The Keg With CO2
Now that everything is connected correctly, all that is left is pressurizing (carbonating)your homebrew beer using CO2! Take off both lids from either side of your fermenter bucket (or carboy) and carefully pour all 8 gallons (32 liters) into each side until full. Make sure to fill the right amount, as this could lead to overflow when pressurizing later on down!
To achieve the desired carbonation level, turn on the CO2 regulator valve slowly until the pressure gauge reads 10-12 PSI, then close it immediately after reaching this pressure. If left unchecked for too long, too much pressure can result in bottles/cans exploding or serious injuries.
Finally, store kratom at recommended temperatures for optimal taste & longevity – usually between 55-70 degrees Fahrenheit (13-21 Celsius).
Step 7: Store & Enjoy Your Homebrew Beer At Last!
After all these steps have been taken care of – cleaning & sanitizing, connecting lines & hoses correctly, filling & pressurizing kratom correctly – now comes the essential part, enjoying delicious home brew!!
Find an ideal spot where the temperature stays consistently at desired range (55-70 degrees Fahrenheit/13-21 Celsius), and grab your favorite glassware ready for some amazing home brew experience like never before!! Cheers!!
Conclusion
Kegging at home can be an exciting process if done correctly! It’s essential to follow all sanitation procedures closely so that contamination doesn’t occur during transfer or while serving drafts on demand directly from taps at home or events.
By following these steps closely and understanding how kegging works, novice brewers can easily transition their homebrewed beers into professional-quality draft beers! Cheers!