


Home-brew kegging equipment is a great way to store and share your favorite home-brewed beer. With the right home brewing kegging equipment and a bit of preparation, you can quickly bring your draft beer system to any gathering.
Are you looking to impress your friends at the next party with your kegged homebrew?
Ensure your kegging kit setup is party-ready, and take your best kegging equipment today!
Going Mobile with Your Home Brew Kegging Equipment
You’ve done the hard work of creating a craft beer that you are proud to call your own. Now is the time to take it out of the house and show it off!
While it might seem intimidating, taking your homebrew to a party is relatively easy. All you need is the right setup and a few simple tips.
If you’re a home brewer who loves to share your creations with friends, bringing keg supplies to a party is a perfect way.
It’s easy to transport, keeps your beer cold for hours, and you don’t have to worry about broken bottles or spilled beer. Nothing says “I’m serious about my home brew” like pouring a fresh pint from the tap.
Let’s consider what you need to know when you start kegging, take your homebrew keg kits homebrew to a party.
Gathering The Equipment, You’ll Need
You’ll need some equipment to bring your kegged homebrew to a party. First, an insulated cooler will keep your beers cold while transporting them.
Next, you’ll need a CO2 tank and regulator with two hoses that attach directly to your keg. Make sure you get the right size of CO2 tank for the amount of beer you plan on serving; otherwise, it won’t last throughout the evening.
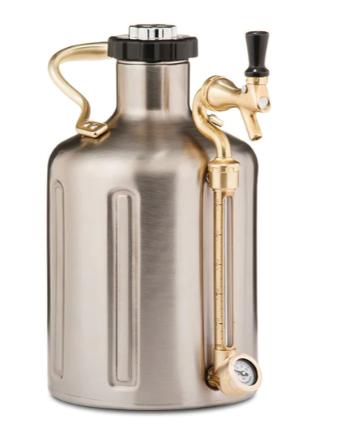
A good starter kit should include a keg tap, CO2 tank, regulator, gas line, beverage line, coupler, washers, clamps, and some ice and keg accessories.
You’ll also want to ensure your guests have enough cups or glasses. Once you have all these items assembled and ready to go, it’s time to set up your mobile bar.
Finally, you’ll also need tap handles for each beer so guests can quickly identify which one they are drinking.
Once you have all these items assembled and ready to go, it’s time to set up your mobile bar.
Preparing for Transport
The first step in transporting your homebrew is ensuring everything is prepared correctly. Make sure that all connections are secure and that there are no leaks.
If your keg has been pressurized with CO2, check the pressure relief valve before disconnecting it from the tap. It’s also essential to have the right equipment on hand when you’re transporting your keg. A dolly or cart is essential for moving heavy containers.
If you’re using a carboy or other large container, it may be necessary to secure it with straps or bungee cords so that it doesn’t tip over during transport.
Keeping Your Home Brew Cold
Once you have everything ready for transport, the next step is to keep your home brew cold while in transit. The easiest way to do this is by packing plenty of ice around the container.
If you don’t have access to large blocks of ice, consider investing in an insulated cover that can help retain cold temperatures even when exposed to direct sunlight or hot weather conditions.
Additionally, try filling a cooler with cold water and submerging the tap directly into it, so it stays chilled while transported.
Protecting Your Home Brew During Transport
Ensure that your home brew is protected during transport by avoiding sudden stops and starts as well as sharp turns—all of which could be disastrous for any loose connections on your kegging system!
Also, be cautious about where you place items inside the vehicle; avoid putting anything too close or directly on top of your beer container, as these items could damage their contents and exterior if they shift during transit.
Finally, always wear gloves when handling glass containers; even small pieces can cause severe cuts if not handled carefully!
Setting Up at the Party
Once you arrive at the party, it’s time to set up your keg kits and start pouring pints! First things first—find somewhere cool enough (ideally between 38-45 degrees Fahrenheit) to sit while they are being tapped.
A basement or garage is usually ideal if space is available; otherwise, an ice bath might be necessary depending on how hot it is outside.
Once that’s sorted out, connect your CO2 tank and line them up side by side before attaching each tap handle and accompanying lines to the fridge or cooler, where they can be chilled until served.
Be sure not to put too much pressure (no more than 11 psi) on these lines, or else carbonation levels may become too high and cause foaming when poured from taps into glasses!
Serving Your Home Brew
Once everything is set up with your homebrew kegs correctly, everyone will enjoy your delicious homebrew!
Don’t just drink, but also talk about what makes each beer unique – discuss flavor notes and aromas amongst friends and any other questions during conversations about brewing techniques used in producing them!
Ensure everyone has their glass so as not to contaminate samples with another person’s saliva/germs when sharing beers!
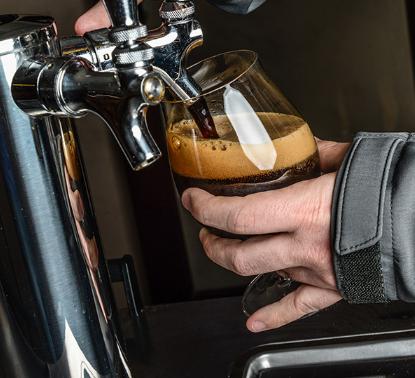
Pour & Enjoy!
Once everything is securely connected and insulated against cold weather—and after making sure there are no leaks—you are ready to pour!
Open up both valves attached to either side of the regulator and begin pouring yourself and your guests’ delicious pints of freshly poured craft beer!
Don’t forget about safety first; ensure everyone knows not to tamper with equipment while enjoying their drinks.
Conclusion
Taking your home-brewed kegging beer on the go doesn’t have to be complicated or intimidating—all it takes is some preparation and knowledge of how each part fits together into one cohesive keg system.
With just a few supplies and some assembly instructions, we can transport our keg systems anywhere we’d like for any occasion!
So next time you’re thinking about throwing an impromptu party or just having an evening out with friends, make sure you remember these steps so that everyone can enjoy freshly poured pints right out of your mobile bar setup! Cheers!