


Making hard apple cider at home is a fun and delicious project that anyone can do with just a few simple ingredients and patience.
The most important thing to know is that hard cider takes time to make. Depending on the variety of apples you use and the yeast you select, your cider could be ready to drink in as little as two weeks or take several months.
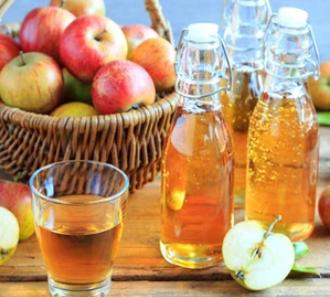
Hard cider is a delicious and refreshing beverage perfect for autumn weather. The term ‘hard cider’ denotes that this cider has been fermented and now contains alcohol.
Sometimes, you will see the term “sweet cider” used to differentiate between hard cider and cider. How will my cider turn into yummy hard cider instead of apple cider vinegar?
Cider making kits are the perfect way for beginners to start learning how to make delicious, hard cider. It only takes a few months to brew a batch, so why not get started right away?
With our beginner’s cider-making kit, you can create your own tasty concoction in no time – just check out all the supplies you need and take the plunge!
Get your cider making kit today and start an exciting new hobby!
What You’ll Need
If you’re thinking of making cider at home, you might wonder how long the process takes. Here’s a quick overview of everything you need to know about how to make a yummy apple!
Let’s take a look at what you’ll need to make your hard cider at home:
Apples
You’ll need about 2-3 pounds of apples per gallon of cider. A mix of different varieties will give your cider more depth of flavor, but you can use all one type if that’s what you have on hand.
Avoid bruised or blemished apples, as those can affect the flavor of your finished product.
If you’re using fresh apples, the first step is to clean and cut them into small pieces. Next, you’ll need to press the apples to extract the juice.
This can be done with a hand-operated cider press or using a juicer. Once you have your juice, it’s time to add the yeast.
Three main types of sweet apple juice
- Fresh Pressed Cider at Home Fresh
- Pressed Orchard Cider
- Commercially Produced or store-bought apple juice
Yeast
There are many different types of yeast available for making hard cider.
Various dry and liquid brewing yeasts will do the trick, and you can find them here.
Although you can buy specialized liquid yeast packs for fermenting cider, dry wine yeasts do an excellent job and are much cheaper.
Consider what you want your final product to taste and smell like when choosing your yeast.
Each one will give your cider a unique flavor profile, so experiment until you find one you like.
Wild yeast is unpredictable and may give off flavors to your finished beverage or make great natural hard cider itself; it’s a gamble.
To ensure good fermentation, I suggest using cultured yeast to have predictable results.
We recommend using champagne yeast or wine yeast for the best results.
Depending on the type of yeast you’re using, fermentation can take anywhere from a few days to a few weeks.
Once fermentation is complete, your sweet apple cider must be bottled and stored in a cool, dark place for at least two weeks before it’s ready to drink.
Sugar
You’ll need sugar to feed the yeast and help it ferment the apple juice into alcohol. We recommend using 1/2 cup of sugar per gallon of cider.
Common types of sugar used are frozen apple juice concentrate, honey, brown sugar, and dextrose.
Equipment
In addition to the ingredients listed above, you’ll need some essential equipment for making your cider, such as hard cider-making kits.
This includes a cheese grater or food processor (for grating the apples), a filter (for separating the pulp from the juice), an airlock (to keep contaminants out while allowing carbon dioxide to escape), and some bottles for storing your finished cider.
Making The Cider
Now that you have everything you need let’s get started! Here’s how to make hard cider at home.
1. Start cleaning your equipment thoroughly with hot water and soap. This procedure is essential for preventing contamination during the fermentation process.
2. Grate or chop the apples into small pieces using a cheese grater or food processor. If using a food processor, be careful not to puree the apples too finely – you want them to be in small pieces, not mushy.
3. After chopping the apples, place them in a large pot or fermentation vessel with sugar and yeast. To evenly distribute the sugar, stir everything together well.
4. Cover the pot with a clean cloth and set it aside in a cool, dark place for 3-5 days to begin fermentation. During this time, check on your mixture once daily to ensure everything is proceeding smoothly.
5. After 3-5 days, it’s time to strain out the pulp from the juice using a strainer or cheesecloth-lined colander. Be sure to press down on the pulp with a spoon or other utensil to extract as much liquid as possible – this will make your final product much more flavorful
6. After removing all pulp, pour the juice into airtight bottles or containers fitted with an airlock (this allows carbon dioxide formed during fermentation to escape while preventing contaminants from getting in).
7. Ferment for another 2-3 weeks before transferring to bottles without airlocks for long-term storage. After about two weeks, the bottles should be appropriately carbonated.
Back sweetening and bottling cider is tricky because the yeast will keep eating the sugars until the bottles explode.
If you prefer a sweet hard cider, consider back-sweetening the cider with a non-fermentable sweetener.
8. Hard cider is best enjoyed chilled, so be sure to pop yours in the fridge before serving!
9. Welcome fall with these delicious recipes featuring everyone’s favorite autumn fruit – apples!
Conclusion
Making hard apple cider is a delicious fall treat that is easy to make at home with just a few simple ingredients and patience!
Just remember that making your own cider takes time – depending on the type of apple used and yeast selected, your finished product could be ready to drink in as little as two weeks, or it could take several months.
Follow our step-by-step guide (including pictures!) below and enjoy a refreshing glass of homemade hard cider all winter long!